Custom Dashboard
Purpose
Create and maintain dashboards that match your role (operator, supervisor, maintenance) and your daily routines.
If custom dashboards are enabled in your deployment, you can add widgets, resize and move them, and lock widgets to a specific machine or time range.
Steps (create a new dashboard)
- Open App > Dashboard.
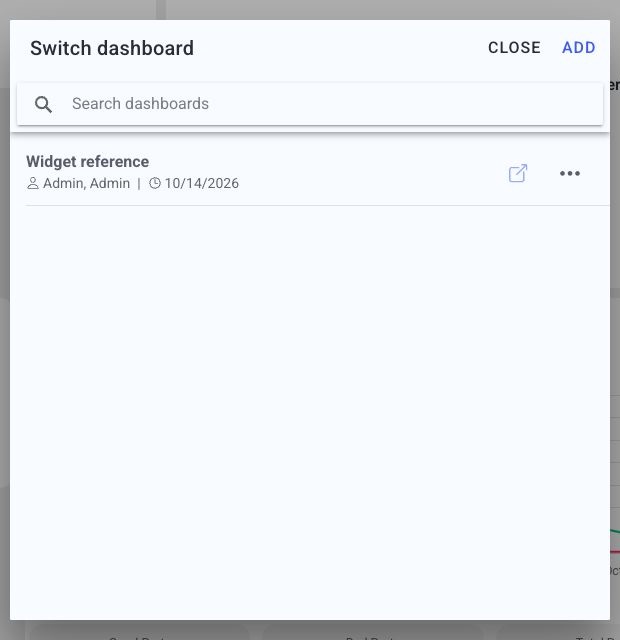
- Open the dashboard selector.
- Select Add.
- Enter a dashboard name.
- Select Confirm.
Menu path example: Dashboard > Dashboard selector > Add > Confirm
Example (dashboard selector, layout may vary by deployment):
Steps (add widgets)
- Open App > Dashboard.
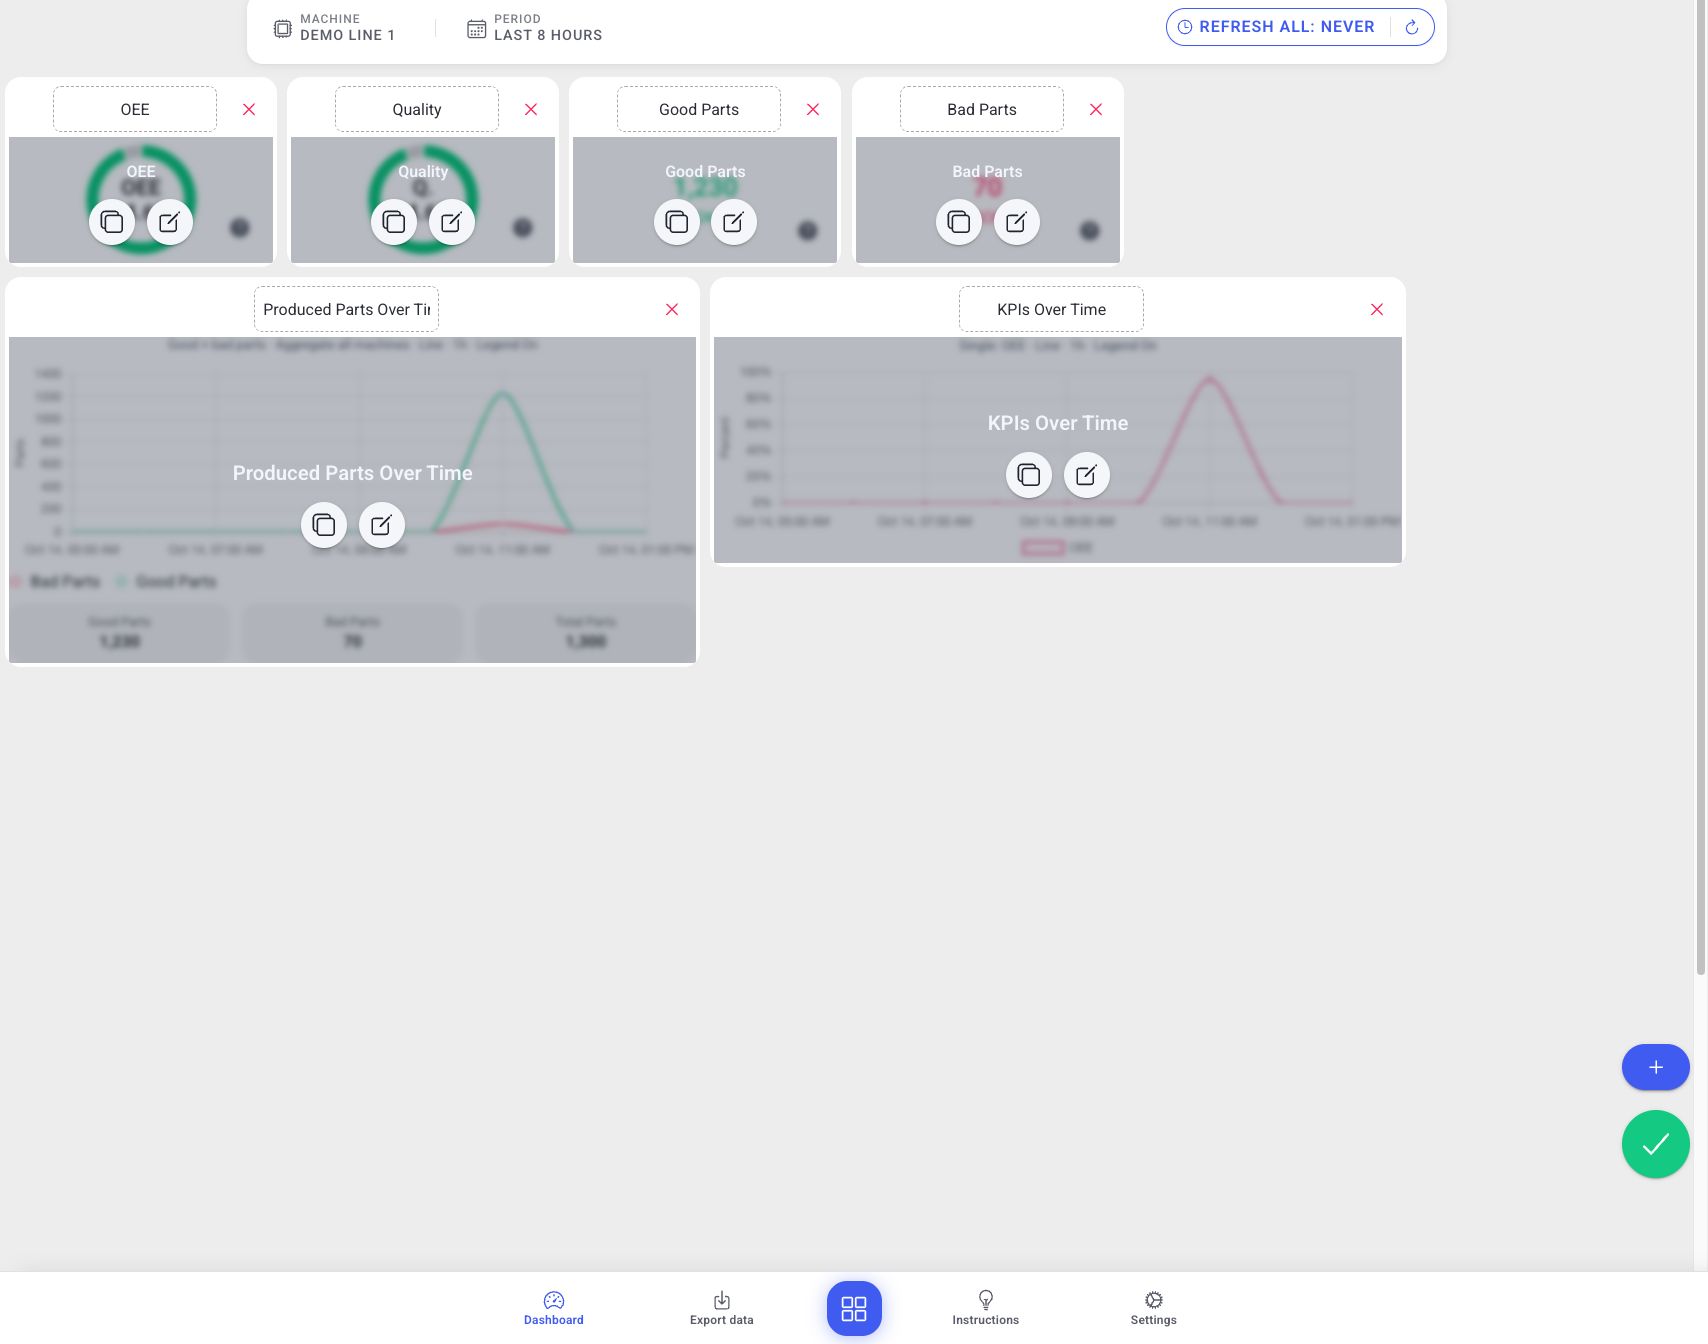
- Enter edit mode using the pencil control at the bottom-right.
- Select the plus control to open Add widgets.
- Browse widgets by category (for example: Errors, Performance metrics, Scrap).
- Select the widgets you want, then select Add to confirm.
Example (edit controls, layout may vary by deployment):
Steps (move and resize widgets)
- Enter edit mode.
- Drag widgets to reposition them.
- Resize widgets by dragging edges or corners (grid-aligned).
- Select the checkmark control to store the layout and leave edit mode.
Example (edit mode, layout may vary by deployment):
The same edit-mode example above shows title fields, duplicate/type actions and the remove (X) controls. Arrange the widgets before leaving edit mode.
Edit widget titles and types
Enter dashboard edit mode to change a widget's title in its header, move or resize it, or use its action buttons:
| Action | Effect |
|---|---|
| Widget title | Enter a descriptive title in the widget header, then leave the field. This changes the dashboard label. |
| Duplicate | Creates another widget with the same display configuration, title and local locks. You can then configure the copy independently. |
| Change widget type | Opens the type picker. For configurable widgets, the edit button first offers Configure and Change widget. Choose Change widget to reach the picker. Select a replacement type and Confirm, or Cancel to keep the existing type. The new type starts with its own display defaults; review its size and settings afterward. |
| Close (X) in the widget header | Removes the widget from this dashboard. The machine's recorded data is unaffected. |
Leave edit mode using the dashboard's checkmark control after arranging the widgets.
Widget locks (machine and time)
By default historical widgets follow the global machine and time filters in the dashboard header. You can override these per widget so a single widget stays on its own machine and/or time range. Machine Status Live and Machine Alerts Live follow machine selections but always show current data; they offer no time lock or Choose time action.
Set a lock
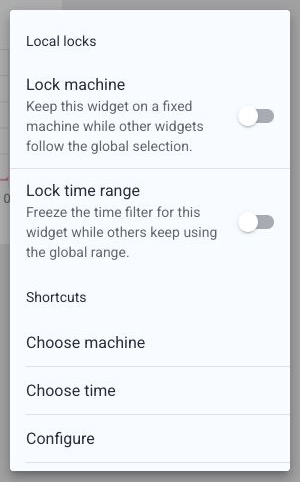
Open the widget's filter menu (the slider icon in the widget header). Under Local locks you have two toggles:
- Lock machine — Keep this widget on a fixed machine while other widgets follow the global selection.
- Lock time range — Freeze the time filter for this widget while others keep using the global range.
When a lock is on, you choose the machine and/or time that this widget should use.
Choose machine opens the machine selector for the widget; confirming a selection also enables its machine lock. Choose time opens the period/batch selector for historical widgets; confirming also enables its time lock. Check the lock indicators afterward to confirm which selection the widget is using. Turn a lock off to return to the corresponding dashboard filter.
Example (widget filter menu with the local locks, names may vary):
How you recognize a locked widget
A locked widget shows small lock indicators in its header and prints its own machine and time under the title, so you can tell at a glance that it is not following the global filters:
- a machine lock icon (the widget stays on the shown machine), and/or
- a time lock icon (the widget stays on the shown period).
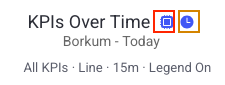
In the example above, the widget is locked to machine Borkum and period Today regardless of what the dashboard header is set to.
Configure a widget
- Open the slider menu in the widget header.
- Select Configure, where available.
- Change the widget-specific options. Their choices and effects are listed on each widget page.
- Scroll inside the dialog if the last fields are not visible.
- Select Confirm to apply, or Close to discard the dialog changes.
The dialog opens with the widget's current saved settings. Defaults listed in the manual describe a new widget without saved overrides. Configuring a widget changes that widget's display and filters; it does not edit the machine's underlying settings or measured data. Bucket, Time interval and Resolution group data within the selected period; they do not replace the dashboard period filter.
The Configure menu action requires permission to edit dashboards. If the action is missing on a widget that supports configuration, ask an administrator to check your role permissions.
If Confirm is disabled, check the validation message: for example, select a metric, add a manual scrap series, or use a valid Top N value. Some fields appear only after selecting a particular view. Widgets without a display dialog still offer their machine/time filter menu; live widgets only offer machine controls.
For Error/Warning Pareto and Timeline widgets, Configure in the main dialog opens a second message filter. Confirm the message filter first, then confirm the main dialog.
What users see
- A dashboard selector (often in the top-left header area).
- Edit mode controls and a widget selection dialog.
- Widget cards with a short description and selection state.
- A widget settings menu per widget (if enabled).
- When you add new widgets, they are inserted at the bottom of the grid first, so the existing layout stays stable.
Best practices
- Standardize dashboards per role so shifts work consistently.
- Keep critical widgets (status + alerts) visible without scrolling.
- Use widget locks sparingly to avoid confusion about which filters apply.
Troubleshooting
- You cannot enter edit mode -> Missing permission -> Ask an admin to review your role permissions -> Use a shared standard dashboard until access is granted
- A widget shows a different machine/time than expected -> Widget is locked to a machine or time -> Open widget settings and remove locks -> Escalate to a supervisor if you cannot change widget settings